Friday, May 24, 2013

May Counterfeit Kit Challenge Members Blog Hop

Hello and welcome to my stop on the Counterfeit Kit Challenge Members Blog Hop for the month of May.
You should have arrived from the fabulous Milissa's awesome blog, so if you haven't, you might want to stop back at the beginning, first here

This month, the theme is MASKING!  Hooray!  Since I've been focussing more on trying to use up my hoard of coloured cardstock, using (and making!) masks has become a more regular feature in my crafting repertoire.

Thanks to having a spare sheet of white cardstock left over in my May Kit, I was once again able to complete today's page entirely from my Counterfeit Kit:


Just like my last page with the "free as a bird" challenge, I had lots of fun mixing up the stickers on this page.  As it's all about imagination and seeing the world like a child, I mixed a bicycle with an ice cream churn, a butterfly with an old-fashioned camera, and layered an insect over a jar!   All with little wood veneer people, as you do.


I hope you'll stop and say hello before hopping over to your next stop . . .Molly!  She does lots of awesome digi pages, so I'm sure it won't disappoint!

Sunday, May 19, 2013

Counterfeit Kit Challenge Design Team Call

It's no secret around here that the Counterfeit Kit Challenge has been my favourite challenge site.  So when they announced a Design Team call, what's a girl to do but apply?  If you're interested in seeing my application for the DT, then read on.

First task, to pick a kit to counterfeit and here's what I chose: Roller Rink, the October 2012 kit from Studio Calico.


And here's my version, which I've named "Ticket Home."


I decided to counterfeit every item in this kit, something I don't always do.  Let's see how, starting with the papers:

The original Roller Rink papers

There's a diamond pattern, a woodgrain, a green, a light blue, a red and white, a grey, a yellow and white and a script pattern.

My version of the papers
 The kit included 4 sheets of cardstock.  I chose to match my colours to my own kit rather than try and match theirs.
 
The "Roller Rink" kit included Woodgrain Thickers and a light blue alpha sticker sheet.  I've replaced these with Studio Calico kraft stickers, a Basic Grey set of larger brown stickers, and a very old set of blue stickers from SEI.  I also included a sheet of stickers from Echo Park which was in one of the add-ons.

I've replaced the exclusive Studio Calico asterix stamp set with this set from Stampin Up:


 One of the embellishments included in "Roller Rink was a "Swan Park" ticket.  I've used this as an excuse to use some of the cute ticket cut files I have for my Silhouette:


Also on my Silhouette, I've cut vellum speech bubbles to mimic those in the original kit, and some shapes similar to the American Crafts puffy stickers sheet which included cars, houses, arrows, ampersands, cameras and clouds.


I don't own any washi tape like the wide striped one in "Roller Rink" so I've put in two other rolls, as well as two lengths of stripy ribbon (I have that wide grosgrain in a number of colours, so I'd dearly love to find some ways to use some of that!)


Last but not least, I've replaced their flair with my own DIY version, and topped up my current stock of DIY dimensional dots to replace the enamel dots.

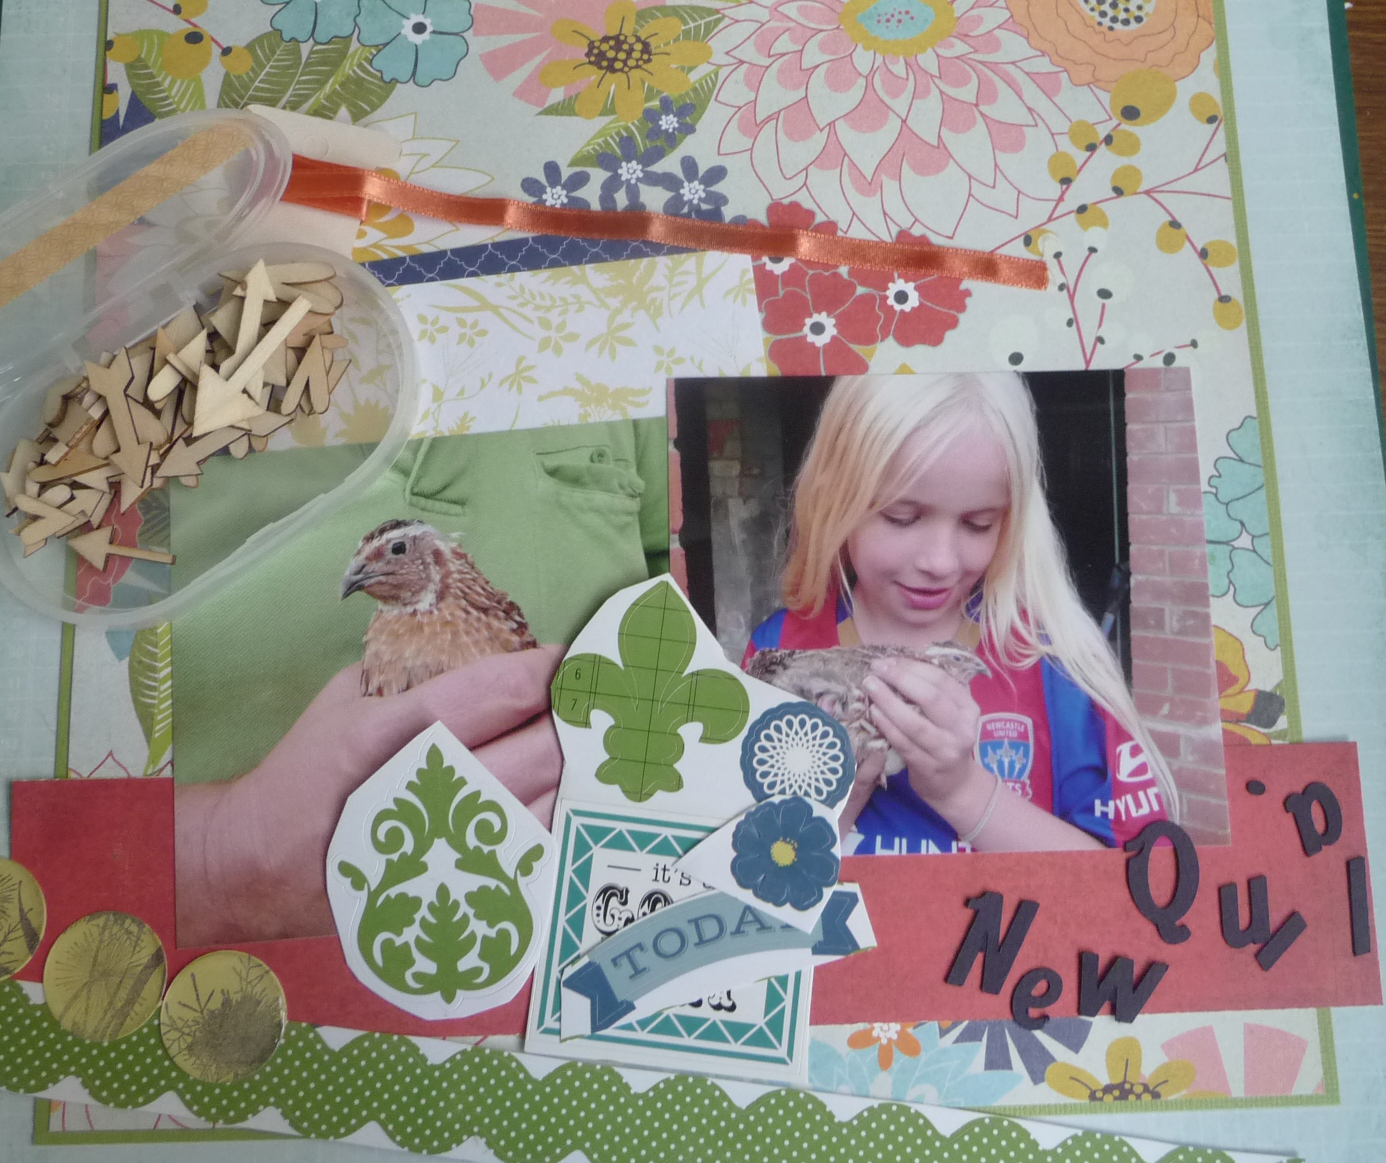
But wait, there's more! Because the other half of the application process is to think up a Challenge, and then create a page based on that chalenge.

The challenge I decided to go with is one based on my Motto for this year, to make a project that incorporates:
Something old, something new, something borrowed and something YOU!


My something old is the grosgrain ribbon (I used some! hooray!) and the blue letter stickers.
My something new is the paper and red letter stickers from Echo Park (not brand-new-release-new, but still new enough for me!)
Something borrowed 
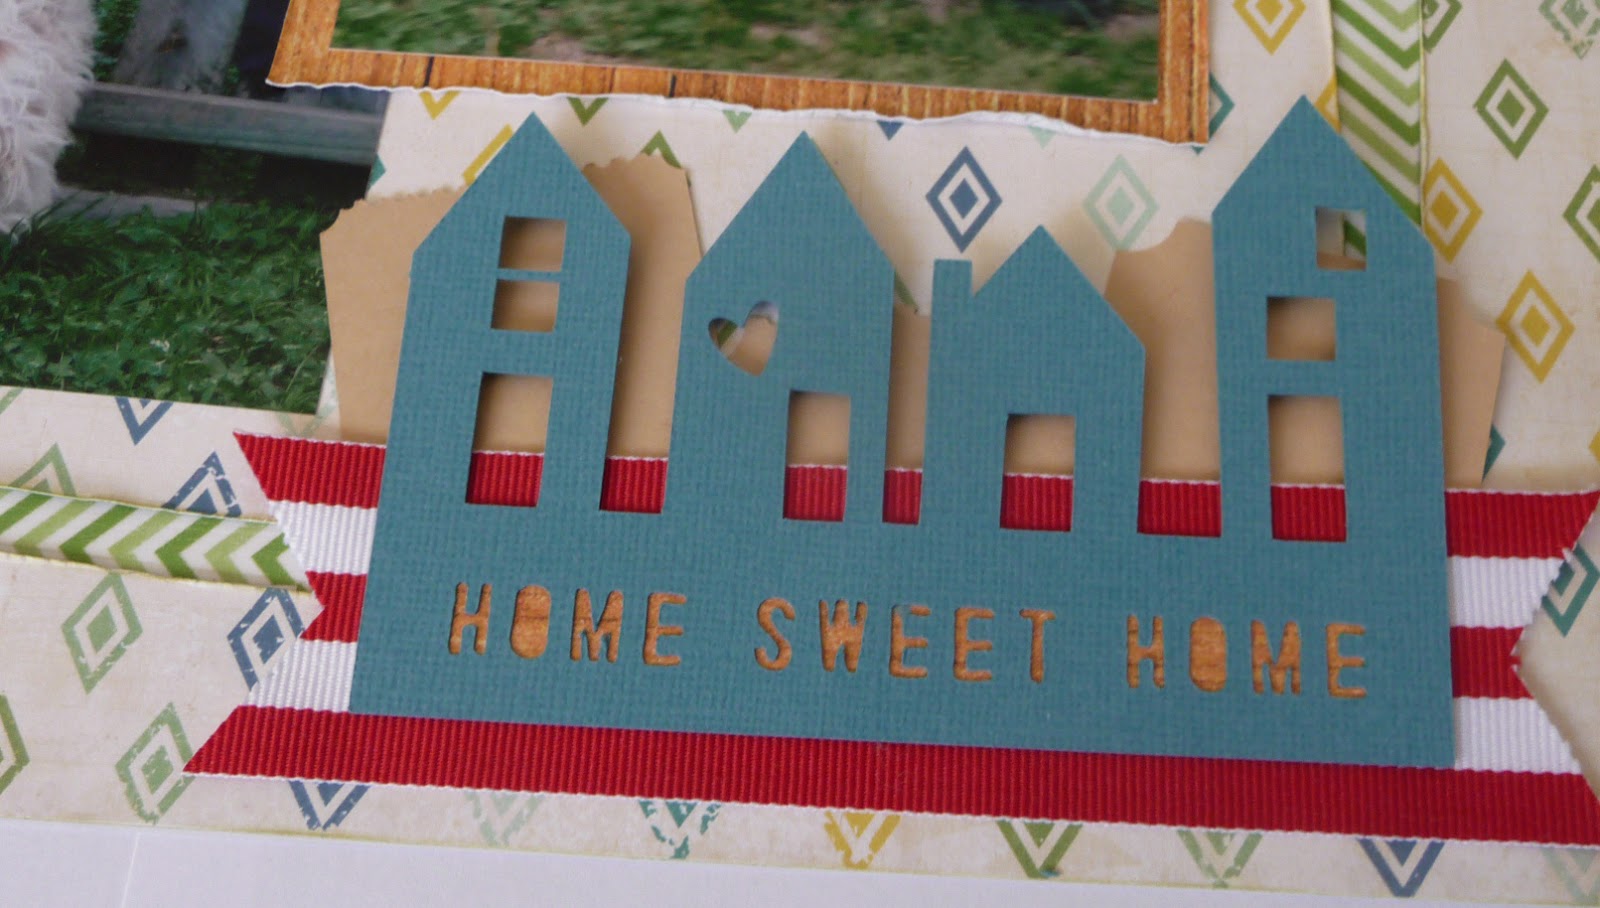
could be interpreted in lots of different ways, but I liked the idea of using it to borrow an idea. I've taken the idea from Liz Kartchner here to cut a frame into the background sheet of patterned paper.
Finally, my something you refers to the sort of techniques that you (or in this case, I) use all the time - in this case, I've included some DIY flair, which seems to appear on every single page I make at the moment, and distressed edges.


The photos on this page aren't perfect, but I love them anyway because that imperfection is part of the story.  If you're a dog-owner you'll know what it's like to have every family member greeted with enthusiasm every time they come home - sometimes you wonder how their tail stays on, they wag so hard!  The ticket die-cuts tucked around the page are a symbol of Rohan catching the bus home, back in that first year of bus catching  - we always knew he was home when Hamish rushed to the gate to greet him!

Thanks for looking and wish me luck!

Saturday, May 18, 2013

When is a Dog like a Bird?


I really wanted to make at least one page for Jennifer Grace's "Onwards and Upwards" event last weekend.  When I came across a photo of our dog, Hamish, at our favourite dog beach, it occurred to me that no only would it fit the "Free as a Bird" theme perfectly, but that would also make a great title for the page!

The dog beach is pretty much the only place (apart from our backyard, of course!) that poor old Hamish is allowed off the lead.  There's an off-lead area at a park near our place that we often walk to, but Hamish has disgraced himself in the past by running home - across a busy road! So until someone gets around to some intensive training, Hamish stays on the lead and watches the other dogs run free!


I applied the challenge to this page on two levels.  As well as the obvious "bird" theme, I took Jennifer's advice by not over-thinking the page and just sticking things down pretty quickly.  I didn't worry, for example about whether flowers, pocket watches and "news" themed stickers had any relationship to a dog on a beach. 

Like I said, free as a bird!

Everything on this page comes from my May Counterfeit Kit.  As I have already made the three pages I set out to make with my kit, this page is quite a bonus!  I made the background by sticking together the rest of the cardstock that I had set aside to cut on my Silhouette as titles, and gave myself great pleasure in using some of the items from the kit I hadn't used yet, like the dimensional stickers and letter stamps.

What direction would you take the idea to be as "free as a bird?"

Wednesday, May 15, 2013

May Counterfeit Kit Part Three: the Finished Pages

So with this month's Counterfeit Kit I've been trying something a little different and trying out what Shimelle calls "Batch Scrapbooking", where you do a number of pages concurrently.  (You can catch up on my kit here if you haven't seen it already). In my last post I had glued down my major paper elements and photos. 
The next step is to sort through the embellishments in the kit and assign them to the different pages:


 I foolishly made this step a lot harder for myself than it needed to be . . . the idea of the process is to use items only from the kit, which is fine, but in my head I had added that I wanted to use all of the items in the kit . . . and that just wasn't going to happen! If you look through the photos above, you'll see that for each page I chose some stickers, a length of ribbon, some wood veneers.  I also made a set of DIY flair for each page using the off-cuts I had included as well as the set of stamps, and I've cut all my titles on the Silhouette using the navy cardstock.


The three-photo page, with photos of my kids with their cousins just before they left after Christmas.


The two-photo page, showing off our cute little quail we bought a few weeks ago 


And finally, the one-photo page, about some amazing friends of ours who parent a little boy with a lot of special needs.  Mind you, whenever there's a list of his conditions, they always list "extreme awesomeness" in there! We  recently attended a benefit raising much needed funds to help them care for their special little guy.


In the end I added splatters to all the pages, and some confetti/dimensional dots to the last one.
I'll leave it up to you as to whether you want to play "I Spy" and see what items did and didn't make it onto the pages, and whether I might have changed one or two . . .

I'm happy to say that's three pages completed using Glitter Girl/Shimelle's process and I'm open to having another go at a later time (minus the self-induced guilt, of course!).  Have you ever tried a process like this?  Or is it something you'd like to have a go at, too?

In the meantime, there might just be enough bits and pieces left in my kit to make another page or two . . .

Sunday, May 12, 2013

Happy Mothers Day to You (and me) - and Inspiration Party #4


 If you're a Mum, I hope you are enjoying/have enjoyed your Mothers Day as much as I have.  Apart from the breakfast-and-presents-in-bed I requested no fighting among my children, and a couple of hours of uninterrupted craft time.  In the end it may not have been 100% uninterrupted, but it was more than a couple of hours so I'm not complaining!

Enough time to finish one more page for Shimelle's NSD Inspiration Party, this time I've decided to use prompt #8, to scraplift myself, and #18, "the power of three".

The page I chose to scraplift is one I did just the other day:


It has lots of elements that I already know are "me", namely the use of off-cuts and DIY elements.  What surprised me was how much I loved the minimal colour palette.  As I have a number of instagrams printed out, I knew I could easily scraplift this design . . .

and as soon as I saw this month's inspiration from Scrapbook Boutique,


I had my colour palette as well, not to mention a starting point for my embellishment!


As you can see, I've  kept the placement pretty much the same, except for moving the bottom cluster across to the left, and substituted the clouds with doilies and butterflies.


My Silhouette got a real workout for this page.  I cut the mask, the title of course, the butterflies, and the doilies using the Silhouette Shape of the Week

Thanks for stopping by and visiting . . . I've got just enough time to link up this page before finishing up my Mothers Day watching The Voice!

Saturday, May 11, 2013

Inspiration Party #3

Confession time . . . when we went on our family holiday in January this year, I forgot to pack my camera!!  Let me tell you, when He Who Loves To Skate suggested I just duck out and buy myself a "big black camera" I was a bit tempted.  But Port Macquarie in January is not the best place for an impulse purchase of a digital SLR, if you ask me, so I made do with my phone camera.

Here's a page I made using some of those photos, and taken more inspiration from Shimelle's NSD Inspiration Party.  This time, I've been inspired by prompt #22, to use square photos, #14, to make a double page, and #9, to do some "fancy cutting".


The papers I've used are a mix of off-cuts and 6" papers.  I cut my title and accent words "skate" "see" and "swim" on my Silhouette, as well as my scalloped circles.  I think next time I print out photos for a page like this I'll print them a tad smaller, but a finished page is a finished page in my books!


Thursday, May 9, 2013

Inspiration Party #2

Ooooh, hello! You've come to visit and see my new favourite page, have you?  Awesome!

I'm playing along with Shimelle's Inspiration Party again, this time using prompt #3, to use mists, and #23, to stretch your supplies.


How did I stretch my supplies? I'm glad you asked!  The mats behind the photos are the A and B side of the same off-cut of patterned paper.  (from Echo Park Everyday Eclectic). 

But that's not much of a stretch, is it?  But wait, there's more! I punched circles from that same piece of paper to custom-make some cloud "flair" from one side, and confetti/dimensional dots from the other. 


The other thing I love about this page is the layers of meaning it contains.  On the surface, it's  about his first time jumping off the diving towers at our local pool, but it's also a message I hope he'll take with him into life.

Because sometimes, you need to take a leap into the unknown . . .

Edited 12/5: I love this page so much I've come back and linked up to my two favourite linky parties, The Memory Nest's Whimsical Wednesday and purplemailbox's Layout Love Linky.  I've also "scraplifted" myself, which you can see here

Wednesday, May 8, 2013

May Counterfeit Kit Part Two: Sticking down papers and photos.

I'm trying something different with my Counterfeit Kit this month, inspired by the recent Glitter Girl adventure "Layouts with Limits" and mild-mannered Shimelle's "Batch Scrapbooking" version.  If you haven't seen one or both of these videos, let me give you a bit of an idea (they're around 40 and 20 minutes long respectively, so if you're short of time you might want to bookmark them and come back later with a cup of tea!)

The first video suggests a specific process designed to help overcome creative block.  She refers specifically to the block that comes with the  feeling of being overwhelmed by too many scrapbooking supplies, and the fear of not picking the perfect ones to match any given page.  The process goes through picking a kit of limited supplies, then making 3 pages using only those supplies.  There is also a helpful PDF file you can download which summarises the whole process, thus avoiding the need to keep returning to the video!  The second video uses the same process, except that instead of completing one page and then going on to the next, she works through all three pages a step at a time, in a process she calls "batch scrapbooking".

First up after compiling the kit (in either version) is to pick the photos for your pages (sets of three, two and one, to be created in that order)  and then decide which background paper you will use for each.


Done! Next, there's a sketch for each page.  Because I'm trying the "batch scrapbooking" version, I've completed each page to the main-paper-elements-and-photos-stuck-down stage.

Three . . .

two . .


and one . . .


So far so good! Owing, perhaps, to having a brand new batch of photos to go through, and following the sketches fairly closely, I've found the process so far relatively quick and painless!

Next step: lay out the pages again and divide the embellishments between the three.  Stay tuned and I'll see you soon!

NSD Inspiration Party, #1

Last weekend, somewhere out there in the Scrapbooking Universe, people were apparently celebrating "National Scrapbooking Day".  Were you one of them?  Personally, my May the 4th consisted of driving a ridiculously long way into the countryside for one child's soccer game, followed by an afternoon sitting in hospital waiting to find out if another child's arm was broken (it wasn't).

While I didn't do any scrapbooking on the appointed day, I certainly don't mind taking advantage of the NSD challenges out there!  Let's Scrap (who never do anything by halves) have declared an entire MONTH of festivities, and I hope to play with some of them later on.  First up, though, I wanted to join in with Shimelle's "Inspiration Party", with a mammoth 24 challenges to choose from, ending May the 12th.

I'm optomistically calling this my first Inspiration Party post, in the hopes of getting another page or two completed before the end of the week . . .

Anyway, here's a page I created using prompt #1, to use pink, and #2, to use 4x6 photos:


If this is the first time you've visited here, you might be interested in the supply list from what is a fairly typical "spend less, craft more" style page:
  • one full sheet patterned paper (Echo Park "Everyday Eclectic")
  • 6 thin strips of paper, all but one from Manufacturer's strip
  • 2 embarrassingly old Basic Grey tags (one cut into three pieces)
  • small amounts of ribbon and fibre, also from deep within the stash
  • one journalling tag, from a cut-apart sheet (one of the Echo Park "For the Record 2 collections)
  • title cut on my Silhouette from cardstock off-cut
  • another cardstock off-cut that was embossed using a friend's embossing folder
  • DIY dimensional dots, made from ridiculously small off-cuts and dimensional adhesive
  • DIY "flair" made from off-cuts and dome stickers (I bought 180 stickers for about $10, which means these three cost about 17c)
  • 2 mists (once again of the DIY variety)
  •  washi tape and wood veneers - these are relatively expensive embellishments, compared to everything else, but because I have kept these purchases to a minimum (three packets of wood veneer and less than 10 rolls of washi to date) and use them regularly, I feel like the cost-per-use is still quite low.

Thanks for visiting. But before you go, why don't you stop and let me know what your favourite ways of getting the most from your scrapbooking dollar are?

Friday, May 3, 2013

May Counterfeit Kit Part One: the Kit

Did I just write the word "May"??!!! Has a quarter of the year gone already? But the good news is, a new month means a new kit to Counterfeit at the Counterfeit Kit Challenge!  This month's inspiration comes from Polly! Scrap Kits and is the March kit "Shoreline" . . .


and the mini kit from the same month, "Totally Rad" . . .


The first thing that struck me when I looked at these images was the navy and white striped paper, which reminded me of a recent purchase which included items from Basic Grey's "PB&J" line . . .


(although the fact that I accidentally bought 2 sheets of the floral paper might have had something to do with it, also!)

With these 2 sheets of paper as the starting point of my kit, I decided both patterns would look great as a beach towel . . . so that's what I named my kit.  This is also part of my cunning plan to make you think I was trying to work in with the Shoreline/nautical theme! ;)


Let's take a closer look at the papers first, shall we?


From left to right we've got 2 papers from Basic Grey "PB&J", followed by one from Echo Park "About a Boy, then Echo Park "Everyday Eclectic, Pink Paisley "Cottage Farm" and one sheet of cardstock.
The 6" papers are from two My Minds Eye collections, "Bright" and "Moments".  I have no idea how recent those two collections are, as they arrived in my mail box this week from a Lets Scrap win, so they're brand new to me!  As you can see, I've stayed fairly close to the colours in the inspiration kit, with the addition of the pink.

Next up I've added a collection of stamps:

This is a great, versatile set with a very useable font, and images that can take you from very feminine through neutral to more masculine pages.  And wait, there's a boat!  See, I did manage to get the nautical theme in after all!


You'd be forgiven for thinking that this was my only lettering this month . . .


but I've actually included another four sheets of cardstock, with the express intent of using them in my Silhouette Machine to create titles.  Of course, once the Silhouette machine is out, I might just make an embellishment or too!


And speaking of making embellishments . . .


I've added just a small selection of off-cuts and some dome stickers, with which I hope to create my two current favourites, DIY "flair" and dimensional dots, or other small elements.

But it's not all DIY this month . . . 


Above you can see I've included my wood veneers, some twine, three lengths of ribbon and one roll of washi.  Below is the stickers I've pulled out: two flat sheets and one chipboard from the Echo Park "For the Record 2" collections, and a rather eclectic sheet which comprises the left-overs of three different Basic Grey collections. (I collated then on a single sheet one day to save room in my storage folder).


 Normally I'm quite happy to dip into my stash while using my Counterfeit Kit, but this month I plan to limit myself to using only these supplies - the only exception being inks, sprays, and of course tools and adhesives.


I'm trying something a bit different this month . . .  I wonder if my supply list rings a bell with anyone? Can you guess what my process is going to be ?  I guarantee some of you will know it when you see it, but I won't bore you with the details now - stay tuned until the next post to see if you guessed correctly!


In the meantime, happy counterfeiting!